Arduino data logger - part 1 (SD card)
- Dario Pittera
- Aug 21, 2021
- 6 min read

During this long winter we needed to buy a dehumidifier for our flat; but was it really working?
So, this time I just wanted to collect some data on the effect of opening the window, turning on the heaters and the humidifier on the level of humidity and temperature in the bedroom.
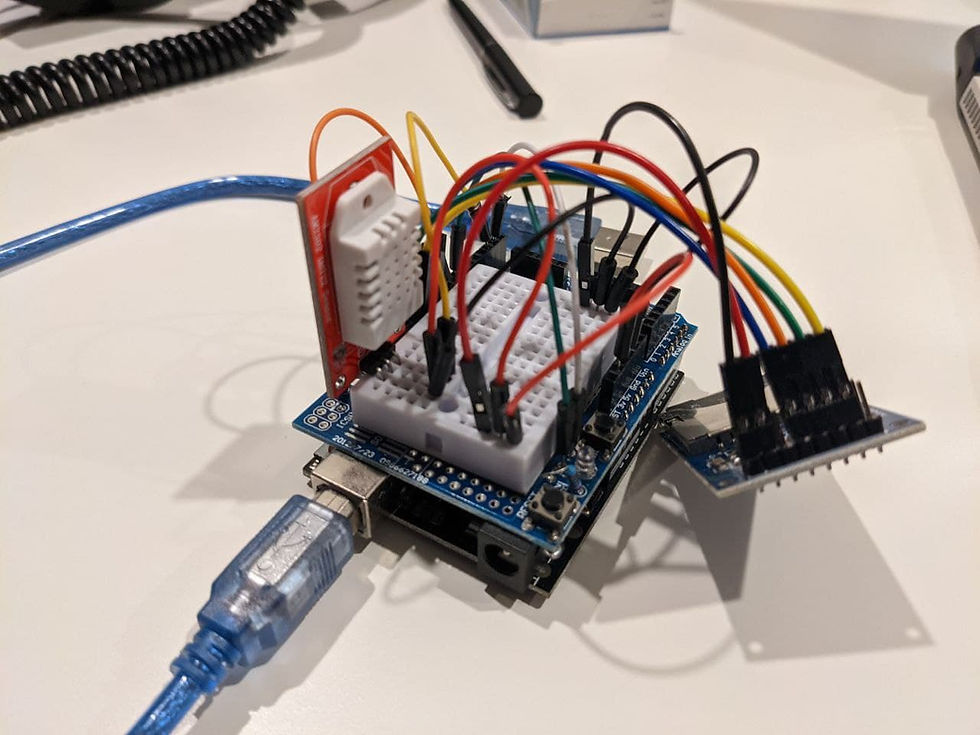
To do this, I put together a small Arduino project with a DHT22 sensor, a SD module and the LEDs and button of my proto shield.
What we need
Arduino Uno
DHT22 (or others) temperature and humidity sensor
SD module
a proto shield (optional)
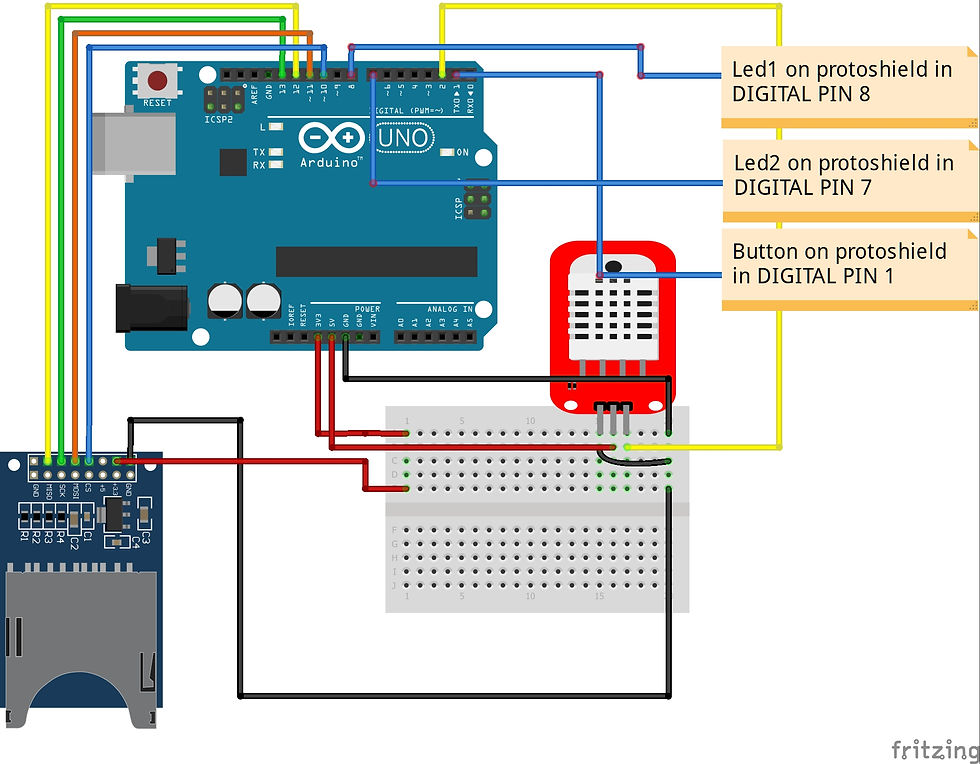
The wiring
Initially, I was just logging data every minute. Just to test if everything was working was fine, but didn't have a way to insert a flag in my data log to signal an external event, like me opening a window or turning on the dehumidifier. I had to unplug and plug again the USB cable so that a new set of headers would be written into the txt file. Plus, if I'd disconnect the cable while the Arduino was writing the data file (really bad timing), I could have some issue. To try it out was fine, but I decided to use one of the two LEDs on the proto shield to signal me that the Arduino was writing. Then I used a button on the proto shield so that when I would press it, a flag was printed onto the log file, while another LED was lighting up to confirm me I successfully pressed the button.
Let's see the code!
Code
You can find the code below on my GitHub, here👀.
Let's see.. We will start by import the useful libraries and defining some useful variables for the temperature and humidity sensor and for the SD module. Also, we want to make sure the button on the proto shield is interpreted as "pressed" only when we are sure it is indeed pressed, excluding any eventual electrical "noise". We will implement a specific function for that later on.
// libraries for temp sensor
#include <DHT.h>
#include <Adafruit_Sensor.h>

// libraries for SD reader
#include <SPI.h>
#include <SD.h>

// DHT SENSOR: Initialize DHT sensor for normal 16mhz Arduino
#define DHTPIN 2
#define DHTTYPE DHT22
DHT dht = DHT(DHTPIN, DHTTYPE);

// SD MODULE: change this to match the CS pin of the SD module
const int chipSelect = 10;

// PUSH BUTTON on the proto board
const int buttonPin = 1;
const int debounceDelay = 10;   // milliseconds to wait until stable

// LEDs on the proto board
const int ledPinWriting = 8;    // proto shield led to signal we are
                                   writing on the SD card
const int ledPinButton = 7;     // proto shield led 2 pin for button
                                   pressed feedback

// USEFUL VARIABLES

// these will be needed to keep track of the time and decide when to log data and turn on/off the proto shield LEDs

// while still being able to check for the pressed button of the proto shield
unsigned long previousMillis4onoff = 0;     // to keep track of time
long ontime = 59000;                        // led1 on time
long SDwriting = 60000;                     // when to log data on SD
long offtime = 61000;                       // led1 off time

bool on = false;                            // to check if the LED was
                                               on
bool wrote = false;                         // to check if to write or
                                               not
bool flag = false;                          // to signal if the button
                                               was pressed (to signal
                                               an event: open windows,
                                               dehumidifier on, etc.)

File myFile;                                // my log file
int id = 1;                                 // to later increase the ID
                                               on the log file
Now let's write the function to catch the button press only when it is sure we really pressed the button and the signal is not due to some "electrical fluctuation".
// DEBOUNCE FUNCTION to precisely state when the button was pressed
bool debounce(int pin) {
 bool state;
 bool previousState;
 previousState = digitalRead(pin); // store button state
 for (int counter = 0; counter < debounceDelay; counter++) {
    delay(1); // wait for 1 millisecond
    state = digitalRead(pin); // read the pin
 if (state != previousState) {
      counter = 0;           // reset the counter if the state changes
      previousState = state; // and save the current state
    }
  }
  // here when the button state has been stable longer than the
     debounce period
 return state;
}
OK, now let's see the setup function:
void setup() {
    // LEDs on the proto board
    pinMode(ledPinWriting, OUTPUT);
    pinMode(ledPinButton, OUTPUT);

    // PUSH BUTTON on the proto board as an input
    pinMode(buttonPin, INPUT);

    // Begin serial communication at a baud rate of 9600
    Serial.begin(9600);

    // Setup DHT sensor
    dht.begin();

    // initialise SD card
    Serial.print("Initializing SD card...");

 if (!SD.begin()) {
      Serial.println("initialization failed!");
 return;
    }
    Serial.println("initialization done.");

    // initialise data file with headers
    myFile = SD.open("data.txt", FILE_WRITE);

    // if the file opened okay, write the headers in it
 if (myFile) {
      Serial.print("Initialising data file...");
      // write the headers in one line comma separated, every time the
         Arduino starts (ID, Temp, Hum, Flag)
      myFile.print("ID");myFile.print(",");myFile.print("Temperature");myFile.print(",");myFile.print("Humidity");myFile.print(",");myFile.println("Flag");

      // close the file:
      myFile.close();
      Serial.println("Done, all good!");
    }
OK, now the juicy part, our loop function:
void loop() {

  // READ THE BUTTON by calling the debounce function and turn on or
     off the LED1
 if (debounce(buttonPin)) {
    digitalWrite(ledPinButton, LOW);
  } else {
    digitalWrite(ledPinButton, HIGH);
    flag = true;
  }

 // start milliseconds timer
 unsigned long currentMillis = millis();

 // Read the humidity (in %) from the DHT22 sensor
 float h = dht.readHumidity();
 // Read the temperature (in Celsius) from the DHT22 sensor
 float t = dht.readTemperature();

 // Check if everything's good with the reading from the DHT22:
 if (isnan(h) || isnan(t)) {
    Serial.println("Failed to read from DHT sensor!");
 return;
  }

  // ACTION 1: check if the waiting time for the led signalling the writing event passed (ontime), and if it wan't already on turn it on
 if ((currentMillis - previousMillis4onoff >= ontime) && (on == false)) {
    on = true;
    digitalWrite(ledPinWriting, HIGH);
  }

  // ACTION 2: if we didn't log any data yet (bool wrote) after the writing waiting time passed (SDwriting) start writing data
 if ((currentMillis - previousMillis4onoff >= SDwriting) && (wrote == false)) {
    wrote = true;

    // write on the txt the temperature and humidity taken from the
       sensor every minute
    myFile = SD.open("data.txt", FILE_WRITE);

    // if the file opened okay, write to it:
 if (myFile) {
      Serial.println("I'm writing"); // for debug reasons

      // now check if flag == true, that is, if the button was pressed
         to signal an external event
      // if there was an event, write 1 in the "flag" column along with
         the other information in one line
      // else write 0
 if (flag == true) {
           myFile.print(id);myFile.print(",");myFile.print(t);myFile.print(",");myFile.print(h);myFile.print(",");myFile.println(1);
        // debug on serial (you can skip this code)   Serial.print(id);Serial.print(",");Serial.print(t);Serial.print(",");Serial.print(h);Serial.print(",");Serial.println(1);
        // reset the flag boolean
        flag = false;
      } else {     myFile.print(id);myFile.print(",");myFile.print(t);myFile.print(",");myFile.print(h);myFile.print(",");myFile.println(0);
        // debug on serial (again, you can skip it)
Serial.print(id);Serial.print(",");Serial.print(t);Serial.print(",");Serial.print(h);Serial.print(",");Serial.println(0);
      }

      // close the file:
      myFile.close();

      // increase ID
      id++;
    }
  }

  // ACTION 3: if the waiting time to turn the led off is passed (offtime), turn off the led and reset all the boolean
 if ((currentMillis - previousMillis4onoff >= offtime)) {
    //Serial.println("sono nel OFFOFF"); // debug reasons
    digitalWrite(ledPinWriting, LOW);
    // reset the previousMillisonoff variable to count to the next interval for all of the 3 actions (led on, writing, led off)
    previousMillis4onoff = currentMillis; // Remember the time
    // reset the boolean variables for the next action
    wrote = false;
    on = false;
  }
}
Basically, now we are always able to check if the button was pressed, while we also have a timer (through the function millis) for the different events to happen. In this case, as you can see from the first block of code, I wait 59 seconds to turn on the LED, then at second 60 I write on my SD, and at second 61 I turn off the LED. In this way, I am sure I don't disconnect my Arduino while it is writing on my SD.
Also, from the block of code above, we can see how I write "0" on the flag column if nothing happens. If instead, the button is pressed, I write "1" on the flag column so that later, when I will have a look at my data, I know when an event happened. For instance, I turn on the heating, I press the button, I get a "1" in the flag column. I press it again when I turn the heating off, I get another "1" in the flag column. This way I can try to correlate my data with my actions. Obviously, I didn't code anything advanced yet to keep track of what type of action I made, but well.. to see the effect of my dehumidifier/heating system on my temperature and humidity levels, it is good enough.
And here a quick line plot of some data collected to try out my device:

OK, not the most beautiful graph, but it will do for a quick check. Humidity is in percentage and temperature in Celsius. The grey vertical lines are my "flags". Well, it seems the dehumidifier is working well :) plus, I get some additional Celsius :) (the second temperature rise is due only to the dehumidifier) two in one! Plus, since for once was not raining, around 9am, also opening the window made the humidity levels to drop.
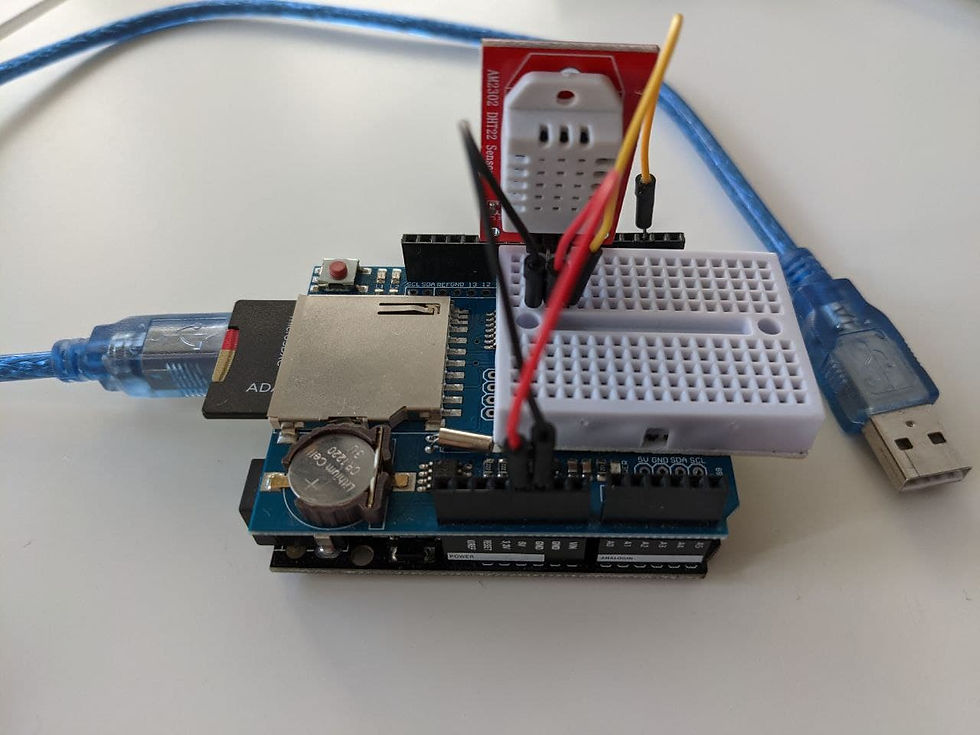
Next, I ordered a shield with an integrated clock (above I just wrote down the starting time and count 1 minute for each entry).

Comments